Golang provides the syscall/js experimental package to facilitate
the creation of browser-based applications without requiring any javascript
transpiler; just targeting your official Go compiler to WebAssembly and loading
the artifact in the browser. This blog post is a simple tutorial to allow you
setting up your Go WebAssembly project, as well as some basic functions to
allow your Go code interacting with JavaScript objects and functions.
Environment setup
Your Go WebAssembly project requires three files:
- A
.wasmfile, containing the WebAssembly binary data. This file is generated by thegocommand after building your project. - The
wasm_exec.jsfile. It's a JavaScript file provided by Go to load your.wasmfile into a Web page. - An HTML file that loads the
wasm_exec.jsJavaScript and invokes it to fetch and execute the.wasmcode into your browse.
You will also need a web server to load the above files via HTTP(S), as the WebAssembly file can't be loaded directly from disk. This tutorial uses dummy Go server code, to avoid installing any server locally.
Create our project
We'll create a simple, Go project, and we will puth the html, js and wasm
files in a directory named site
Linux/Mac command-line instructions:
$ mkdir go-wasm-tutorial
$ go mod init github.com/mariomac/go-wasm-tutorial
$ cd site/
(Replace github.com/mariomac/go-wasm-tutorial by your own module name).
Download wasm_exec.js
The wasm_exec.js file is available in your standard Go installation. Just copy
it into the site folder with the following command:
cp "$(go env GOROOT)/misc/wasm/wasm_exec.js" ./site/
Create your HTML file
For example, let's create an index.html file under the site folder:
<html>
<head>
  <meta charset="utf-8"/>
  <script src="wasm_exec.js"></script>
  <script>
    const go = new Go();
    WebAssembly.instantiateStreaming(fetch("main.wasm"), go.importObject)
        .then((result) => {
          go.run(result.instance);
        });
    </script>
</head>
<body>
</body>
</html>
The file is empty. It just loads the wasm_exec.js and fetches the main.wasm
file that is created in the following section.
Compile your code into main.wasm
Let's create a dummy Go program in the ./main-wasm/main.go path of
your project:
package main

import "log"

func main() {
    log.Println("Hello Gophers!")
}
And let's compile it into the ./site/main.wasm binary file:
GOOS=js GOARCH=wasm go build -o ./site/main.wasm ./wasm-main/.
Please observe that you need to set the GOOS and GOARCH environment
variables to js and wasm, respectively.
Execute your Go WebAssembly program
You will need a Web server to allow fetching all the information. Modern IDEs like IntelliJ IDEA bring their own bundled server, so you can preview your local files as if they were in a remote server.
If you are using a plain text editor and don't want to install any web server,
the following server.go file in your project root will do the job:
package main

import (
	"fmt"
	"io"
	"net/http"
	"os"
	"path/filepath"
)
// super-simple debug server to test our Go WASM files
func main() {
    http.HandleFunc("/", func(w http.ResponseWriter, req *http.Request) {
        if req.RequestURI == "/" {
            req.RequestURI = "/index.html"
        }
        file, err := os.Open(filepath.Join("./site", req.RequestURI))
        if err == nil {
            io.Copy(w, file)
        }
    })
    fmt.Println(http.ListenAndServe(":8080", nil))
}
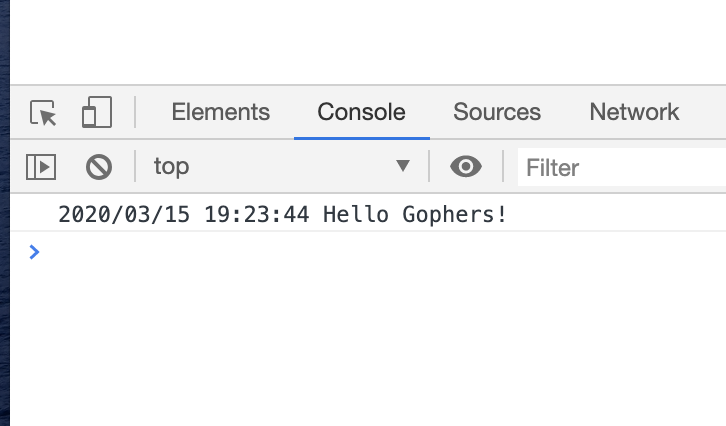
When you run the server (e.g. go run server.go) and go to
http://localhost:8080 in your browser, you should see an empty screen. But if
you open the Console in the developer tools section of your browser,
you should see that the log command in the ./main-wasm/main.go has been
executed:
To allow Go interacting with a Web Page and read/write contents in the actual
HTML document, let's see some methods of the syscall/js library.
syscall/js basic functionalities
Let's walk through the basic functionalities of syscall/js with a simple
example:
 1: func main() {
 2: 	window := js.Global()
 3: 	doc := window.Get("document")
 4:	body := doc.Get("body")
 5:	div := doc.Call("createElement", "div")
 6:	div.Set("textContent", "hello!!")
 7:	body.Call("appendChild", div)
 8:	body.Set("onclick",
 9:		js.FuncOf(func(this js.Value, args []js.Value) interface{} {
10:			div := doc.Call("createElement", "div")
11:			div.Set("textContent", "click!!")
12:			body.Call("appendChild", div)
13:			return nil
14:		}))
15:	<-make(chan struct{})
16: }
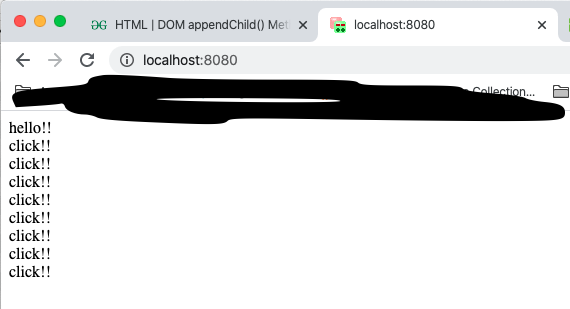
This code adds to the HTML document a <div> element containing the Hello!!
message. In addition, the program is subscribed to the onclick event of the
document, and each time the user clicks the document, a new <div> is added,
containing the click!! text.
The functions used in this example are:
js.Global() in Line 1 returns the global object, usually the equivalent
to the JavaScript window object: the root object that will allow you accessing
all the other elements in your page.
js.Global() returns a js.Value: a struct that can store any JavaScript type.
You will get used to work with js.Value, as it's what most functions and
properties return.
The Get method invoked on a js.Value returns another js.Value
belonging to the property passed as argument. For example, the Get invocations
in lines 3, and 4.
The opposite of Get is the Set function, which receives two arguments: the
name of a property, and its new value. The value doesn't
need to be a js.Value instance: you can pass numbers or strings, like in
lines 6 and 11, and even instances of js.Func (lines 8-9), that specify
a function to be assigned to this property. In the example of lines 8-9,
a given Go function is assigned to the onclick event.
Finally, the example code also uses the Call method of js.Value to invoke
methods of a given type. Call requires the name of a function as the first
argument, following by a variable number of arguments. Examples of Call are
seen in lines 5, 7, 10 an 12. As for Set, the arguments can be native Go types
or other js.Value or js.Func.
The simplest way to instantiate a js.Func is by means of the js.FuncOf Go
auxiliary function.
To know more
This introduction tutorial does not cover many other functionalities, as
instantiating JavaScript objects. For more details, please check the
syscall/js package documentation.
The examples of this blog post are available in my Github repo.